
Chocolate. It has been my comfort food for as long as I can remember. The lovely depth and the different flavors and emotions that can come along with something as delightful as chocolate. Whether it was Valentines Day or just one of those days when friends or boys were not being particularly nice, chocolate was there. My mother and I share this love of chocolate. My personal favorite is dark chocolate, the darker the better. And people know about this. My boyfriends mother sends me chocolate along with my family. Suffice to say, chocolate is a big deal to me.
I also have a love for cooking and making food for other people. This primarily started with my mother and her ability to cook pretty much anything. Some of her best dishes she makes are experiments.
My wanting to cook was inspired even more by the movie "Julie and Julia". Now personally I have a theory that some people are their names and some are not. Julia Child was definitely a Julia and how can I not be inspired to cook when I share my name with a world famous chef.
Not only that but the movie started my interest in French cuisine and just recently I have discovered the ever popular French Macaron.
The very first Macaroons were similar to today's amaretti with a crisp outer shell and a soft middle.
The name for it comes from the Italian word for paste which is maccrone.
No one really knows where exactly the Macaroon came from but some believe it can be traced to an Italian monastery.
The name derives from the Italian maccherone which comes from ammaccare which means to crush or beat. This is in reference to one of the main ingredients being almond flour.
Macaroons came to France in 1533. Two Benedictine nuns seeking safety in the town of Nancy during the French revolution paid for their stay by making and selling the cookies.
Macaroon is the Italian version while Macaron is the French version.
I was first introduced to Coconut Macaroons ,which are my brothers favorite Christmas cookie to date, when I was a small child.
Coconut was added to the recipe and eventually in some cases replaced the almond flour all together. It was much easier to ship and transport the sturdier Coconut Macaroons versus the fragile meringue based Macarons.
The Macaron popularity is not as high in the United States as it is in European countries. Just recently have we been exposed to Macarons. Like the new cupcake fad, Macarons and Macaron shops are popping up all over the place and in many major cities such as Los Angeles and New York. They can come in a variety of different colors. I've made some that were Bronco colors for the most recent Super bowl. These were the very first macarons I had ever made or well tasted.
.jpg)
The recipe even though to some may seem daunting is actually not that difficult. Just time consuming. They can be modified to whatever color, flavor, size or shape you want. Today its cute little cupcake boutiques, Tomorrow its French Macaron Chalets.
For the Macaron shells
2 egg whites at room temperature
1 cup of powdered sugar
3/4 cup of almond meal flour
2 tbsp of unsweetened cocoa powder
4 tbsp of granulated sugar
For the Chocolate Ganauche Macaron filling
8 oz of semi sweet chocolate
1 cup of whipping cream- use 1/2 cup for a thicker filling consistency
1 tbsp of vanilla extract
Materials needed
2 mixing bowls
1 scraper
1 hand mixer or stand mixer or a really strong friend that doesn't mind beating egg whites forever
1 sifter
1-2 cookie sheets
parchment paper
1 large and 1 small cooking pot
measuring cups and spoons
Instructions:
1) Sift together Cocoa powder, almond meal flour and powdered sugar. Discard any large crumbs
2) Separate eggs, and discard or use yolks if needed.
3) Whip egg whites into soft peaks, adding in granulated sugar about a tbsp at a time.
4) Fold together the egg whites and almond meal flour mixture until fully combined and at correct consistency.
5) Preheat oven to 300 degrees Farenheight and line cookie sheets with parchment paper.
6) Place Macaron mixture in a piping bag or ziplock bag, snip off corner and start piping the macaron shells onto the parchment paper so that they are between 1 to 2 inches in diameter and about an inch apart.
7) Bang baking sheets on flat surface to pop air bubbles in shells and let sit between 20 to 45 minutes. Test to see if ready to bake by touching a shell and if your finger comes back clean they are ready to bake.
8) Set timer for 8 minutes and place one baking sheet on the very top rack and one on the very bottom. Once done, switch the cookie sheets and rotate each 180 degrees and bake again for 8 minutes. Once done, carefully move parchment paper with macaron shells to flat surface to cool.
9) While cooling, make the ganache by combining the semi sweet chocolate, vanilla and whipping cream in a medium sauce pan and placing it on top of a smaller sauce pan that has boiling water in it.
10) Let cook until all ingredients are combined, then remove from stove and place sauce pan with ganache filling in refrigerator for 1-2 hours to firm.
11) Once the ganauche is set, place in a piping bag to pipe onto cool macaron shells or use a knife and spread on one side of macaron shell and then sandwich the ganache with another macaron shell.
12) Enjoy immediately.
If you need anymore help or would like some more tips on how I made my Marvelous Chocolate Macarons, you can find plenty of pictures with links to more in depth articles and different tricks I did that helped me down below. As well as the links to the different Youtube videos that I used for the recipe and a Works Cited for the information about the history of the Macaron.

MAKING THE MACARON SHELLS
Start off by sifting together your powdered sugar, almond meal flour and cocoa powder in a large mixing bowl.Here is the powdered sugar

And the almond meal flour. This is a bit hard to find and I had to go to my organic food store to find it. But if you're serious about making macarons, you have to have this. You cannot substitute regular flour for this.

You'll be left with larger crumbs that wont go through the sifter. That's totally fine! Don't try to press them through. You can either snack on them, which I personally don't have the taste for, but some do. Or you can throw them away. You want the finest dry mixture possible.

Now the cocoa powder.

And in the sifter.


This is the only brand I have found that has almond meal flour. Bobs Red Mill has a variety of different flours. When I was looking for this particular type, I also found by the same brand tons of other types of flours such as millet flour which I thought was really interesting. Heres a link to the Bobs Red Mill Natural Foods website


But because I'm a bit OCD and would like it to be the finest possible, I sifted it again!
And here it is!

SEPARATING THE EGGS!
Now get your eggs!
They should have been sitting out for a while so the whites will be around room temperature. I put mine out for about an hour to two hours ahead of time. I have four because I'm making a double batch.

So this is tricky!Look over this before attempting!!
First thing you're going to do is crack your egg and carefully open it so you have two halves of a shell.
I had to have my roommate help me for this part because it is really difficult to get images of separating eggs while doing it.
"Hey hall? Can you help me? Its really hard to separate eggs and get pictures. If I had another hand growing out of my chest I would totally capture every single drop, but since I don't, I'm in need of some assistance."

Now you're going to pass from one shell to the other the yolk, being very careful to not get any yolk in the whites. The whites will fall into the bowl below as you pass the yolk back and forth.


Now once all the whites of the egg are in the bowl, you are going to put the yolk in another bowl and repeat the process with the other eggs.

Yolks!

Whites! You don't want any yolk in your whites because we are going to be whipping the whites, and if there is any yolk, it wont whip.
WHIPPING THE WHITES
Now to make this much easier you're going to want to measure out your sugar before you start whipping so you can easily add it in as you go.

Start whipping and when the yolks start getting frothy you can start adding about a tablespoon at a time of the sugar. You're going to want to whip in a counter clockwise or clockwise direction. Keep your beaters going in the same direction and don't switch, this helps with whipping the whites properly.

This is what frothy looks like and now you can start adding in your sugar.

Keep whipping.

Getting there eventually.

You'll want to whip and keep adding in all the sugar until you have soft peaks like this!
See how pretty and glossy that is? That's how its supposed to look.

It'll look like little mountains that just softly fell over. I've found doing soft peaks gives you the consistency you want in the end.
" Look how pretty they are! Look at my egg whites!"

Now you're going to want to get your trusty scraper and gently scoop your whites into the bowl with your almond flour, powdered sugar and cocoa powder in.

See that? I just love how pretty and silvery the whites look.

And you're going to want to gently fold the whites into the almond mixture.


Keep mixing. You're probably going to want to find a comfy seat, because this takes a bit.

Now to fold you're going to want to go around the edge of the bowl and then press the mixture up against the side of the bowl.

Keep the mixture turning over and over until you have it all fully combined. Make sure you get down to the very bottom and get all the dry mixture that may be hiding in the corners.

Keep mixing. This is getting close, but not quite there.

This is about where you want it.
This part is tricky because its hard to get it just right. Over mix and the mixture will be too runny and the "feet" (I'll show exactly what those are later) wont form. Under mix and the feet wont form properly

" You haven't been mixing hard enough if your hands don't look like this. "
Ok well I'm just messy, but you get the point. Theres a lot of mixing involved
Now get some parchment paper and some cookie sheets and line them with the parchment paper

Like this!

Now get your biggest cup, and put a ziploc bag or a piping bag in it. The cup will really help with filling the bag with the macaron shell mixture and give you a lip to scrape your scraper off on.

This!

And you're going to want to seal the bag and then cut off a small triangle from the corner of the bag.

And start piping away. The shells should be about an inch apart.

Then you're going to want to find a hard surface such as a table and bang the baking sheet with parchment paper and macaron shells and all on it a few times. This will pop any air bubbles that are in the batter and help the macarons to form their shape.

The macaron shells should be about an inch to two inches in diameter.

Let them sit between 15 minutes to an hour. I have found with the Colorado climate anything upwards of 30 minutes really makes the best macarons. They form their shape and set a bit better.

Put them in the oven at 300 degrees Fahrenheit with one baking sheet on the very top shelf and one on the bottom shelf. Set the timer for 8 minutes.

Once the 8 minutes is up you're going to switch the baking sheets so the one that was on the top shelf is now on the bottom shelf and vise versa. You're also going to turn the baking sheets. So what end was near the door of the oven will now be near the back and what end was near the back will be near the door. Don't worry, all of this craziness ensures equal baking for all macarons involved.

Let them cook for another 8 minutes and then take those babies out!

And you'll be left with something that looks like this. I put gold glitter sprinkles on the top of them if you're wondering what the heck is on top of those.

I take the parchment paper and carefully slide macarons and paper onto a flat surface to cool for about 15 to 30 minutes.
NOW FOR THE CHOCOLATE GANAUCHE

First get a smaller pot of water boiling.
Random fact- That little pot is the perfect size for a single box of Annies macaroni and cheese.
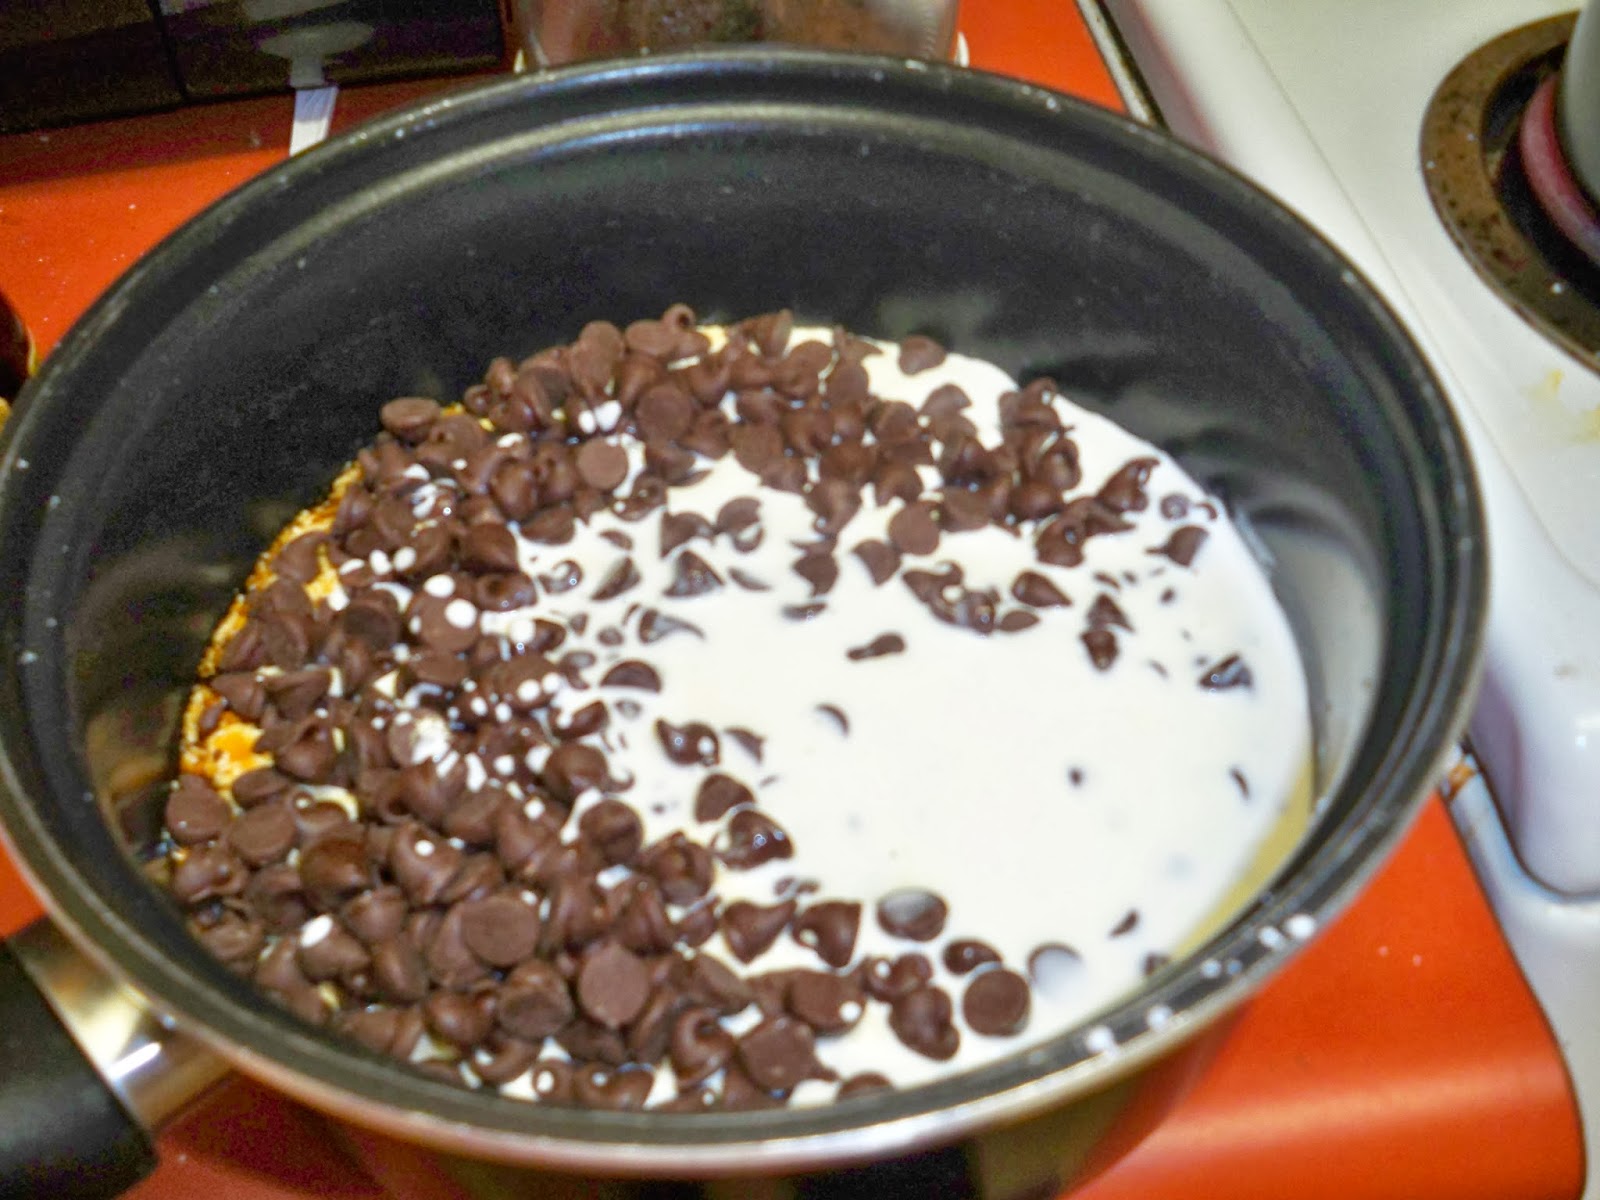
Then in a larger pot, pour in your semi sweet chocolate, vanilla and whipping cream.

Then place the big pot on top of boiling little pot. You do this because if you place chocolate directly onto a heat source, it will burn and then we will be out of chocolate and very sad.

Carefully hold your big pot on top of the little pot and stir the mixture until it is fully combined.
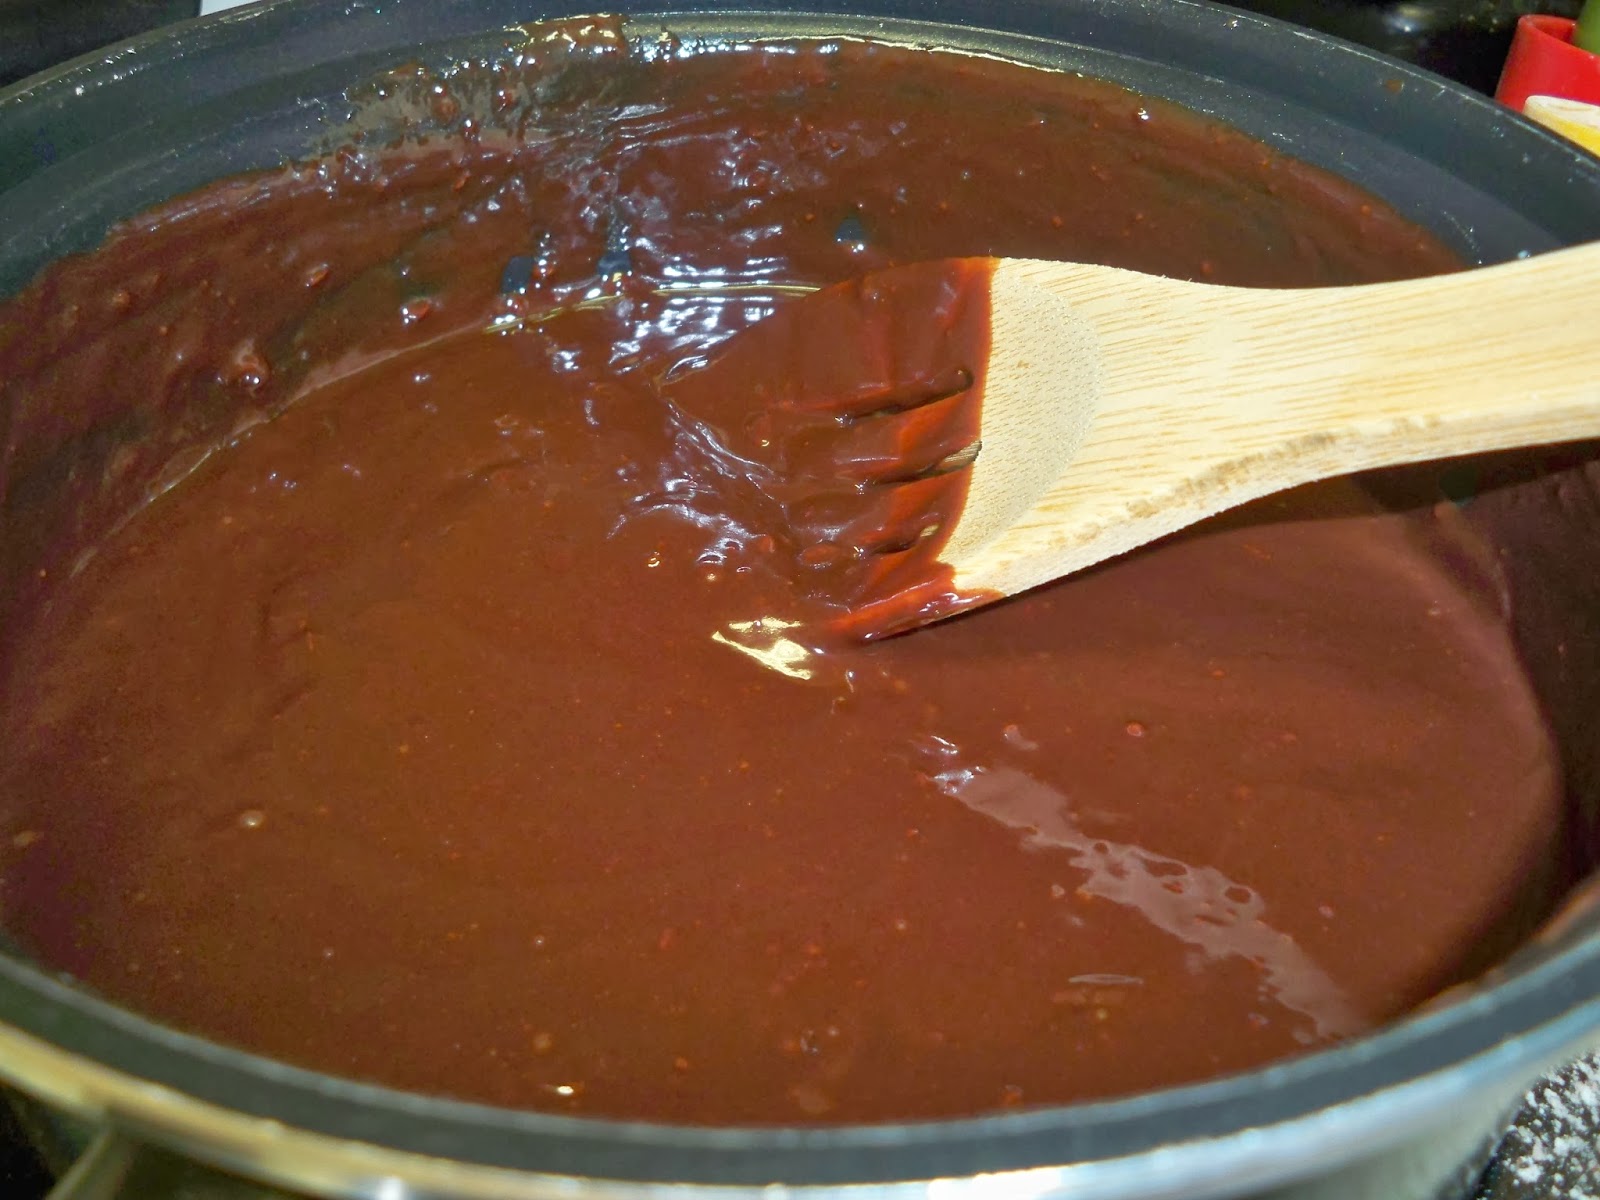
It looks like this! All pretty creamy!

Now what you're going to do is not eat this!
I know its sad but its for the best.
Youre going to take this pot, get a hot pad and place the pot on the hot pad in your refrigerator for 1-2 hours to let the ganauche cool and thicken.
PUTTING IT ALL TOGETHER
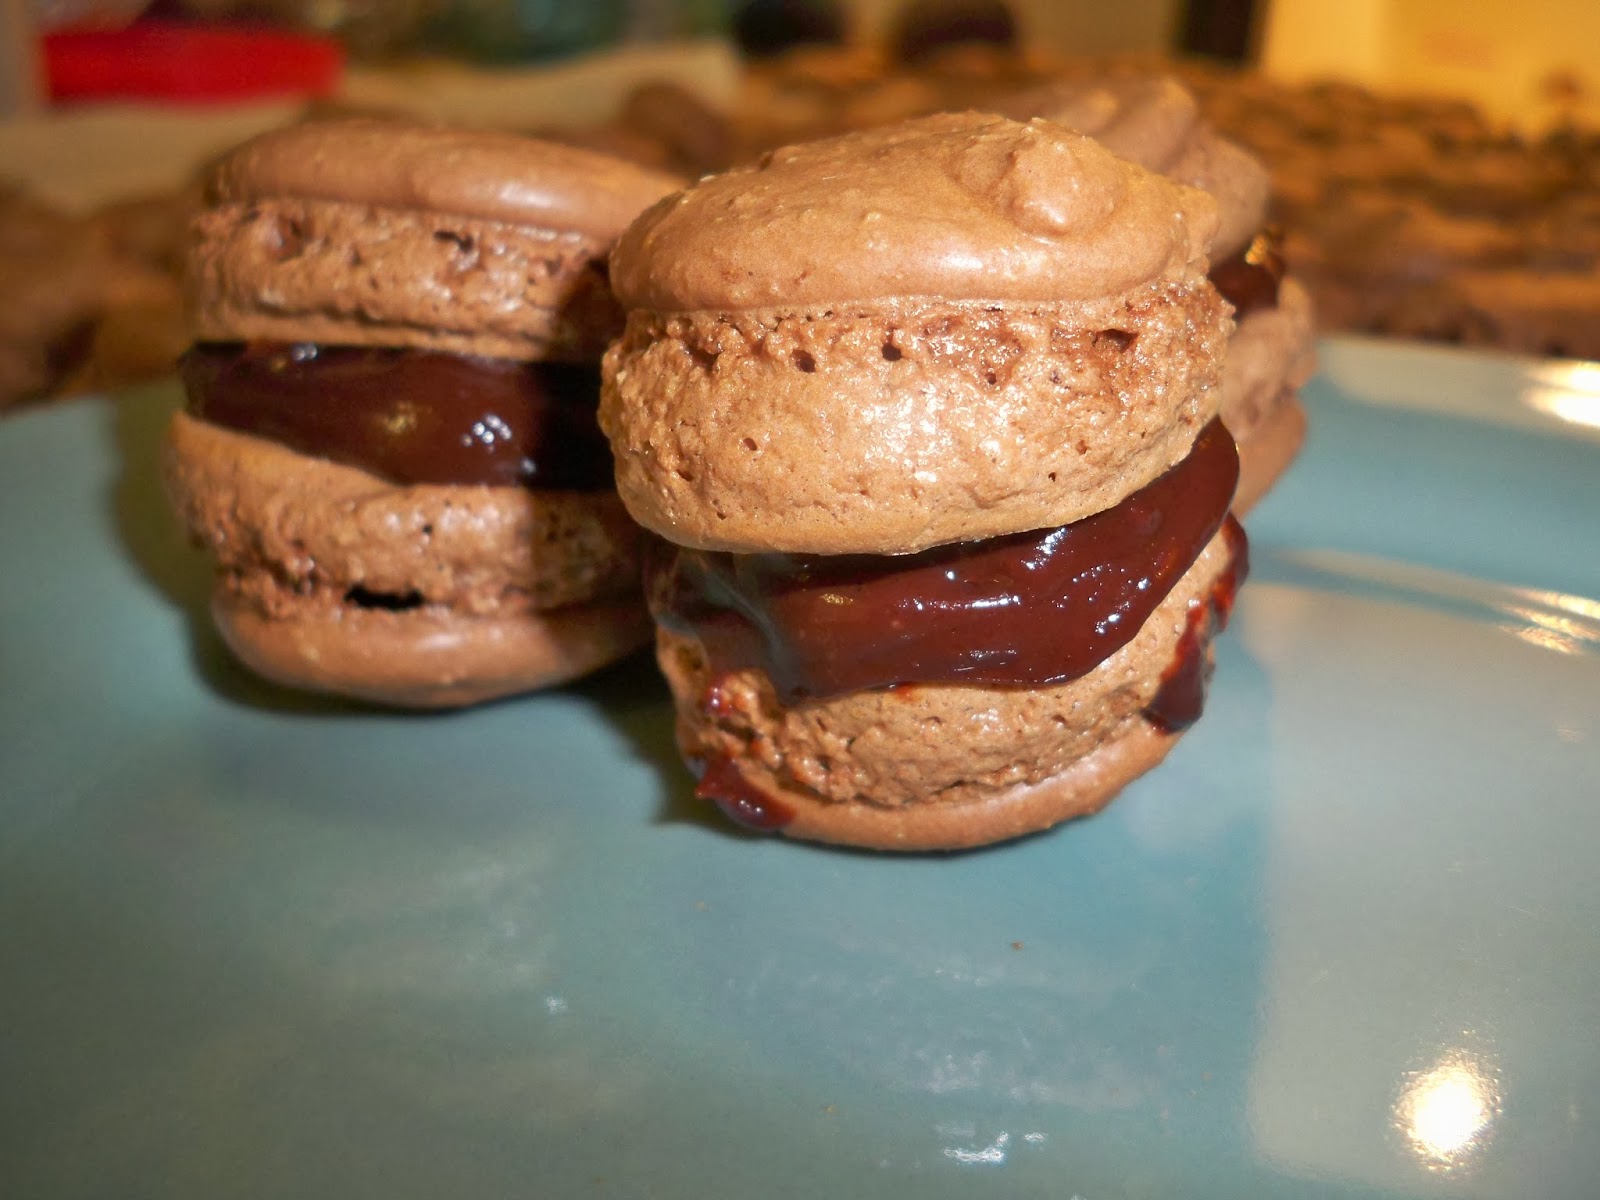
Once its thickened you can either put it in a piping bag and pipe the ganache onto the macarons OR you could just take a knife to it and spread it on one yourself. Then take another shell and sandwich the ganauche in the middle.

You're left with these delightful little macarons!


Now go share them with neighbors or whomever is nearby that you love. These are my lovely neighbors Lane and Matthew. They enjoy when I bake.

ENJOY MY LOVLIES
Video for the chocolate macaron recipe:
http://www.youtube.com/watch?v=VpOx2ZZ91Ig&feature=c4-overview&list=UUUwwFcdnYsF0eX7I98Ghhwg
Video for the original macaron recipe:
http://www.youtube.com/watch?v=f_kn2x1Qj4E&list=UUUwwFcdnYsF0eX7I98Ghhwg
Works Cited
NA. "The History of Macaroons." The Nibble. Lifestyle Direct, Dec. 2006. Web. 20 Feb. 2014.